Chapter 2: Get Started with Unity
2.1 Introduction
This chapter is intended for beginners who are new to Unity or exploring game development for the first time. In this chapter, you will launch a learning template directly from Unity Hub. This template provides a guided, interactive experience designed to introduce the core features of Unity.
By the end of this chapter, you will be able to:
- Explore how Unity’s primary windows and tools function
- Create and arrange GameObjects within a 3D scene
- Build a simple playable experience with basic character interaction and user interface (UI) elements
- Learn how Unity integrates features such as audio, animation, and visual effects
- Optionally build and share your project, depending on your target platform
2.2 Launching Get Started with Unity: In-Editor Tutorial
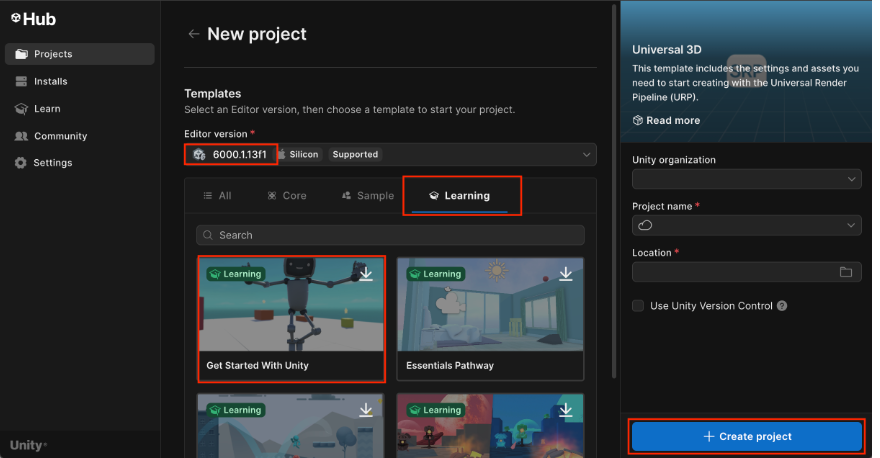
To get started, you will launch a learning project using Unity Hub, which serves as the central application for managing Unity installations, projects, and templates ( see Figure-1).
Follow these steps:
- Launch Unity Hub: Open the Unity Hub application on your computer.
- Create a New Project: In Unity Hub, click New Project.
- Select a Unity Editor Version : At the top of the project creation window, ensure that a supported Unity version (such as Unity 6.3.0 or later, or a recent LTS version) is selected.
- Open the Learning Tab: Under the selected Editor version, click the Learning tab to access Unity’s guided tutorials and templates.
- Choose the “Get Started with Unity” Template Locate and select Get Started with Unity. This template provides a guided, interactive, in-Editor learning experience.
- Name and Create the Project: Enter a name for your project and choose a suitable location on your computer. Click Create Project and wait for Unity to initialize the project. This process may take a few minutes.
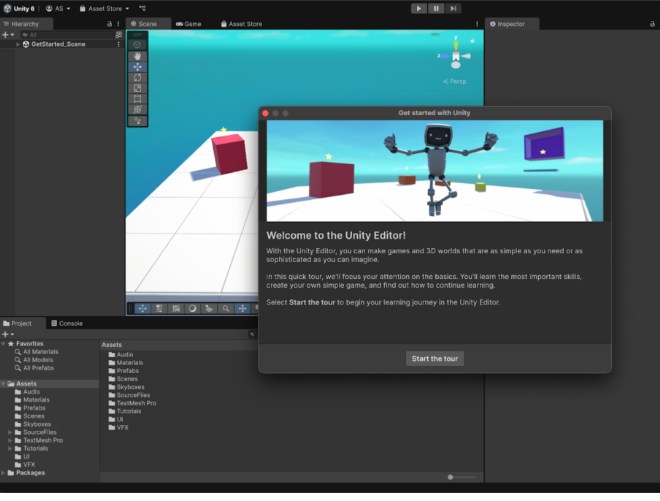
The Unity Editor will open and display a welcome screen. A robot character will appear to guide you, indicating that the tutorial is ready to begin (see Figure 2).
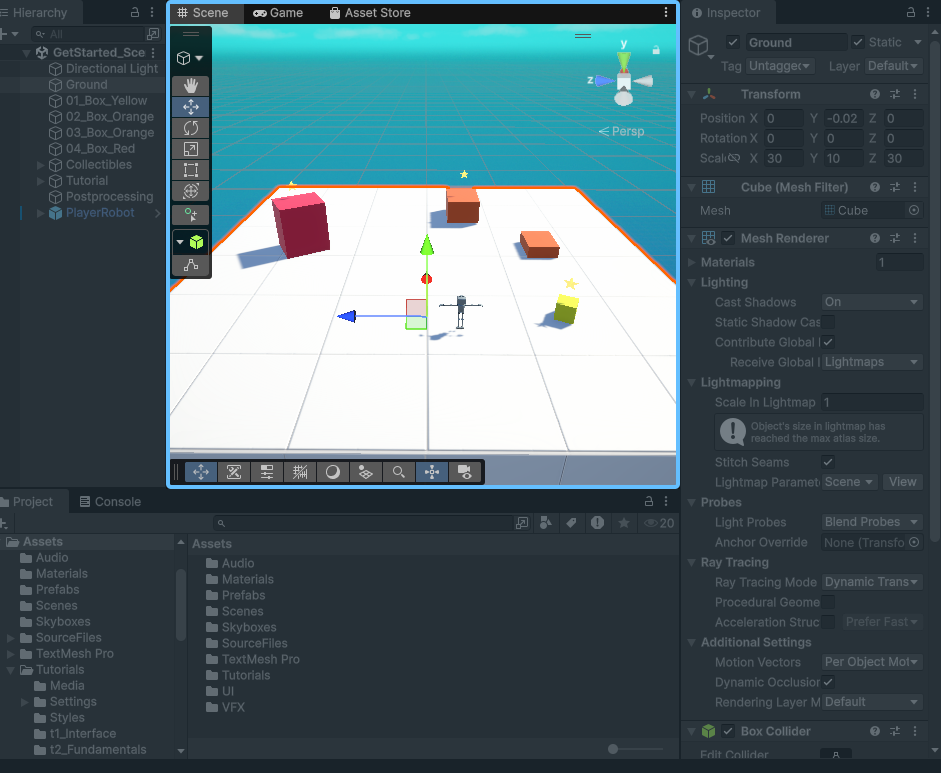
2.3 Unity User Interface
In this section, you will become familiar with the default Unity user interface in windows visual studio. As you explore the different panels, you will also begin adding elements to your scene, such as displaying a character (e.g., a bird) on the screen. When Unity opens, the default layout is divided into several key panels (Figure 3):
- Project Panel: Located at the bottom of the screen. Drag the sldier all the way to the left to see assests in a list.
If you don’t see the slider, click ⋮ in the project windows and select Two-column layout
The Project panel contains all the assets used in our game, including: - collection of artwork - models - Scripts - other assets you’ll use to create application, such as a playable game.
Drag the slider all te Some of these assets will be created within Unity, while others can be imported from external sources. For example, you can drag and drop image files.
Scene Panel: you will view your 3D or 2D worlds and manipulat the things in them.
Hierarchy Panel: The Hierarchy panel lists all GameObjects in the current scene and helps you organize them. A scene typically represents a level or environment in your game. Any object you add to your scene, such as physical objects, lights, audio sources, visual effects, or characters, will appear in this panel.
- Inspector Panel: The Inspector panel displays detailed information about the selected GameObject (such as the Ground object) and allows you to view and modify its properties and settings. It is used to edit components and configure nearly everything in the Unity Editor.
To Reposition the Robot- Select the PlayerRobot GameObject in the scene
- In the inspector window, change the position coodinates as
X =-10| Y =5|Z=0
- Player Character: It represents the user in the game world. We will use PlayerRobot Game Object that you can use as the player character. To get the Player Character
PlayerRobot:- In the project window, open the
Assets -> Prefabs Folder - drag the
PlayerRobotasset from the project window into the Scene view and onto the white ground in your scene.
- In the project window, open the
- Game Window: use the Play/Stop button at the top of the Editor window to enter play mode.
- Use the arrow
keysorWASDkeys to make the robot walk - use spacebar to jump
- move mouse to look around
- hold Shift to make the robot run
- Use the arrow
- Save Game: Press
Ctrl+Sor select File -> Save from the main menu to save.
2.4 The 3D Fundamentals
- Changing Surface Appearance of GameObjects:
- In the Project window, open the folder:
Assets -> Materials - Drag the desired material onto the selected GameObject in the Scene view or Hierarchy
- In the Project window, open the folder:
- Changing the Sky:
- In the Project window, open the folder
Assets -> Skyboxes - Drag the desired skybox material into the Scene view (or assign it via Lighting Settings: (i) Window → Rendering → Lighting, (ii) Locate Environment Settings (iii) select Skybox Material)
- In the Project window, open the folder
- Using the Tool Ovelay:
- Select the View tools (Hand icon) from the Tool overlay in the top-left corner on the Scene view (see Figure 4).
- In the Scene view,
- Left-click and drag with your mouse to pan your view from side to side
- Right-click and drag with your mouse to look around
- check the other option in the Tool overlay such as Move Tool,Rotate Tool, Scale Tool and Transform Tool.
- Use keyboard controls:
- Click inside the Scene view, then use arrow keys to adjust the view
- Up/Down arrows zoom in and out; Left/Right arrows pan horizontally
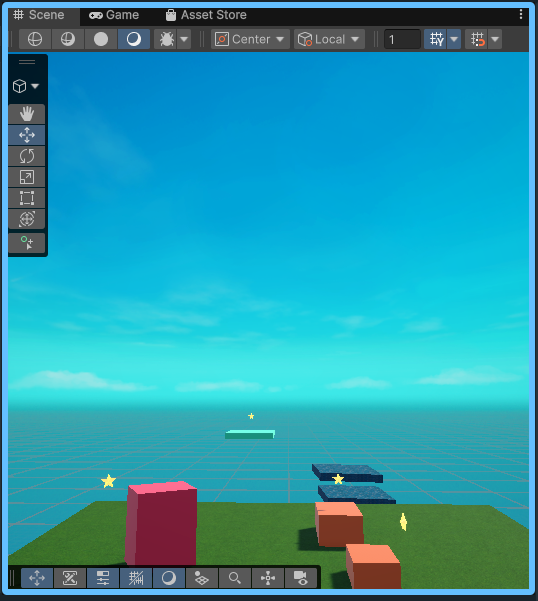
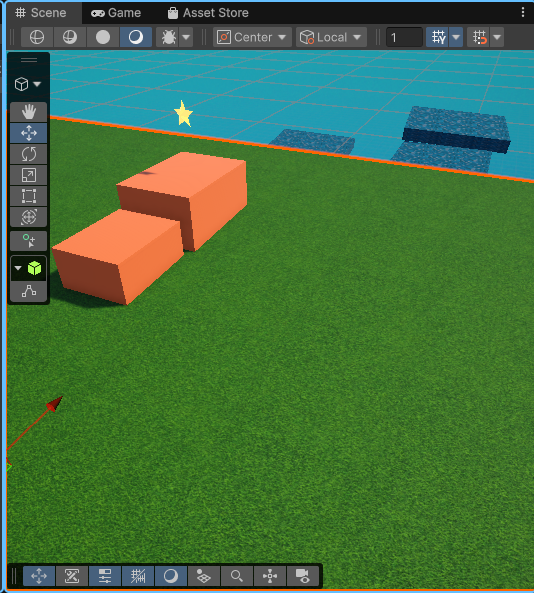
- Use the Move Tool to position objects (e.g., move the smaller orange box next to the larger one, as shown in Figure 5)
- Enter Play mode and collect the second star.
View After moving Orange Box - Adding Stairs to collect the third Star
- From
Assets->Prefabsfolder, drag and drop thestairs - Use the Rotate Tool to adjust the orientation of the stairs
- Use the Move Tool to position the stairs next to the red box
- Enter Play Mode and collect the third star.
- From
- Create a Ramp to collect the fourth star
- In the Hierach window, click Add(+) button in the upper left corner
- From menu, select
3D Object -> Cube - use the Scale Tool to resize of the cube into a platform
- Use the Rotate Tool and Move Tool to orient the ramp to reach fourth star (Figure 6).
- Enter the play mode and collect the fourth star.
- Always remember to save your work after making changes
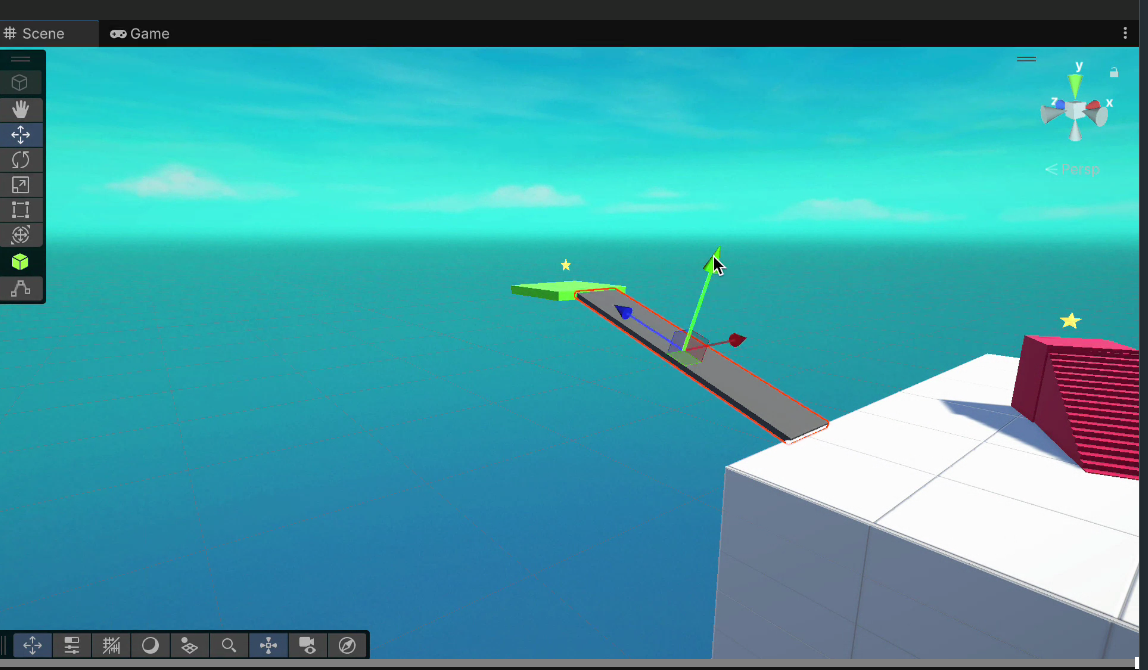
Creating Ramp using Cube
2.5 Explore the Possibilities
Now that you have learned the basics, you can further enhance your scene by exploring additional features in Unity. Feel free to experiment and be creative as you improve your project.
- Animation: Animation brings a scene to life by adding motion to objects. For example, you can animate a tree swaying in the wind or a ball bouncing up and down.
- Moving Platform to collect the 5th star
- Open
Assets-> Prefabsin the Project window - Drag the
Moving_Platforminto the scene - Position it at the edge of the ground
- Enter Play mode and use the platform to collect the 5th star.
- Open

- Simulating Light and Lighting Effects:
- Open
Assets-> Prefabsin the Project window - Drag the
Wall_Light_LeftandWall_Light_Rightonto the corresponding walls - Adjust their positions as needed to enhance the scene lighting
- Open
- Audio Effect: Audio adds realism and immersion to your game. The robot character includes an Audio Listener, which functions like the player’s ears.
- Open
Assets-> Audio - Drag an audio asset into the Hierachy window
- Enter Play Mode to hear the sound
- To remove the audio, right-click the object in the Hierarchy and select Delete
- Open
- Visual Effect (CFX): Visual effects such as snow, fireflies, or rain can enhance the atmosphere of your scene.
- Open
Assets->VFX - Drag a VFX asset into the scene
- Set the position coordninate to
X =0 | Y=0| Z=0in the Inspector windows. - Enter Play Mode to view the effect
- Open
- User Interface: User Interface (UI) elements provide information and allow player interaction through buttons, menus, and displays.
- Open
Assets-> UI - Drag the Remianing_Collectibles_UI asset into the Hierarchy window. Note: we won’t notice anything change in the Scene view
- Enter Play Mode to see the UI in action.
- Open
- Creating Stairs using Cube to collect the final star
- Click
Add(+)button in the Hierarchy window - Select
3D object -> cube - use the
Scale toolto reshape the cuve into a platform - Apply a meterial from
Assets->Materials - Duplicate the platform using Ctr+D.
- Use the
Move Toolto arrange the platforms like stairs leading to the final star - Enter play mode and check you design.
2.5 Building and Publishing
You can share your completed game online using Unity’s web build system.
- Click

- From the main menu, select
File->Build Profiles - From the Platforms list, select Web (WebGL).
- Select Switch Platform (see Figure 8) and wait for the process to complete. Note: If the Web platform apperas grayer out, click
install with Unity Huband install theWebGL Build Supportmodule before switching platform - Click
Buildand choose a location to save your project - Enter a name for your build and wait for the process to complete
- Click
Publish to Playin the Build Profiles window. It will open a newPublish to Unity Play Window - A new publishing window will open
- Select you most recent build and blick
Publish. - Wait for the unpload to complete.
- Edit the title, description, and visibility of your project
- Click Update to finalize and share your game online